How to install Ubuntu in VirtualBox in Simple Easy Steps
VirtualBox, made by the Oracle team, is a really solid choice for virtual machines. It's free, and the easy-to-use interface makes it a breeze to get going.

If you’re interested and keen to give Ubuntu a shot (it’s a widely used Linux system), here’s some great news. You don’t have to replace your current operating system, whether it’s Windows 11 or macOS, on your laptop or desktop. You can actually run Ubuntu alongside your main operating system in a virtual environment, like a virtual machine.
VirtualBox, made by the Oracle team, is a really solid choice for virtual machines. It’s free, and the easy-to-use interface makes it a breeze to get going.
Follow the below steps to install Ubuntu in VirtualBox.
Setting up Ubuntu in VirtualBox involves a few steps. First off, you’ll need to download and install VirtualBox. After that, grab the ISO file for the specific version of Ubuntu you want. Once you’ve got both, jump into VirtualBox and follow the step-by-step wizard to get your Ubuntu installation up and running.
- Just go to the VirtualBox website, find, and download the latest version (which is 7.0.12 at the moment). Make sure to click on the right option for your operating system; they’ve got choices for Windows, macOS, and Linux.
- Simply double-click the downloaded file to start setting up VirtualBox. Just a heads up: your internet connection might briefly pause during the setup as it installs the network interfaces.

- Don’t forget to uncheck the box that says “Start Oracle VM VirtualBox.” There is no need to have the app open just yet, because our next step is to download Ubuntu. After that, hit the finish button.

- Head over to the Ubuntu download webpage. Opt for the latest LTS version; it’s the one with the most support. Right now, as I’m writing this, it’s Ubuntu 22.04.3 LTS.
- Just hang tight for the ISO to finish downloading. The wait time might vary depending on your internet speed.
- After the download wraps up, open up VirtualBox. Look for the “New” option at the top of the app.

- Name your Virtual Machine. Let’s call it “Ubuntu” for this example.
- Click the downward arrow under “ISO Image,” and select “Other.”
- Go to the location where you saved Ubuntu’s ISO file and click on “Open.”

- Tick the box that says “Skip Unattended Installation” and then click on “Next.”
- Adjust the amount of memory available to Ubuntu. Generally, more is better for faster performance. But if your main system has limited RAM, consider going a bit lower to avoid slowing it down too much. We recommend sticking with the suggested amount.
ALSO READ: Samsung Galaxy S24 Ultra – Real Leaked Images, Rumored Specs, Release Date & News

- Set the number of processors available. Our advice is to stick with the recommended amount.
- Click “Next” and pick a size for your virtual hard disk. This is essentially the space Ubuntu will use. More is better, but if your PC is running low on space, consider going a bit lower. The installer usually suggests an amount it thinks is suitable for your system.

- Click Finish.
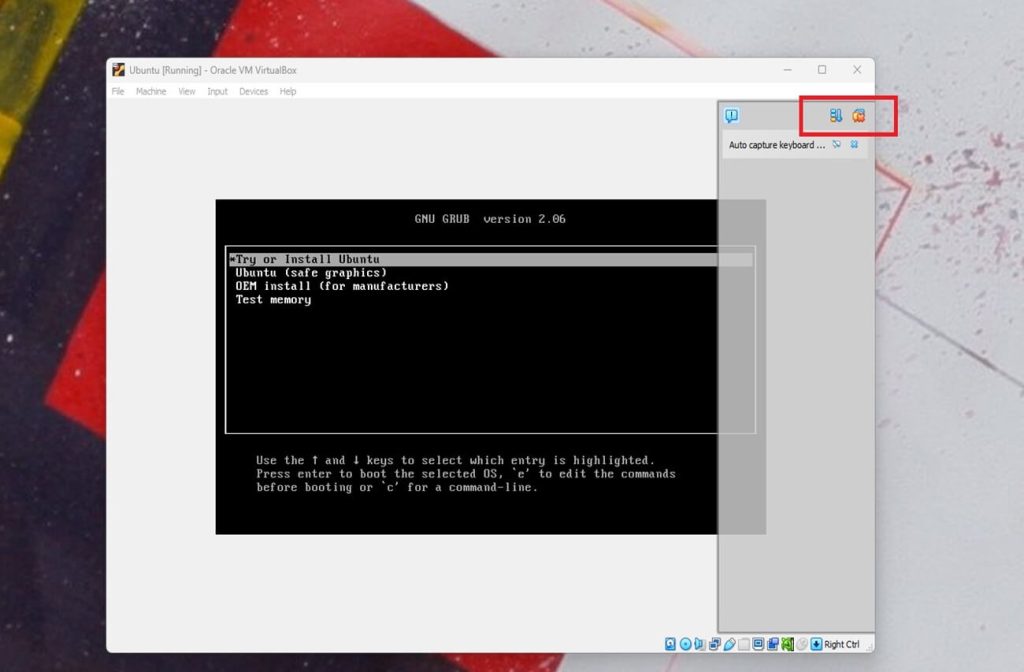
- After adding the virtual machine, hit the Start button to get it up and running. Your main keyboard and mouse will be automatically captured when you hover over the active VirtualBox window, allowing you to control the virtual machine. To switch back to your main OS, just click outside the window. In case you encounter any problems with your keyboard or mouse, VirtualBox assigns a Host Key that lets you manually switch control in and out of the virtual machine. Typically, it’s set to the Right Control Key.

- Hit Enter on the “Try or Install Ubuntu” option. If the sidebar is annoying you, click the “Delete notification” button at the top left of the window to get rid of it.
- Select the “Install Ubuntu” option and just follow the steps on your screen.
- We recommend going for the normal installation, selecting the options to download updates while installing Ubuntu, and installing third-party software.
- If it asks, go ahead and pick “Erase disk and install Ubuntu.”


- You can provide a name and password for your installation, then proceed with the setup. After that, just follow the prompts to reboot, and once it’s done, you’ll find yourself on your virtual Ubuntu desktop.
Here are some extra tips for you:
That’s it! You’ve got Ubuntu up and running on VirtualBox, and here are a few extra tips for you. If you want to go full screen with your new Ubuntu, just click inside the virtual machine, press the Host Key, and press F. Alternatively, you can do this from the main menu by clicking View and selecting Full Screen. When you’re ready to shut down Ubuntu, simply turn it off like you would with a regular Ubuntu machine. Alternatively, you can close the VirtualBox window and choose to save the machine state, making it easy to get back to what you were doing.
Just a heads up: remember that Ubuntu is running on a virtual machine, so the performance can vary depending on your computer’s age and specs. It might not be the speediest, but it’s a fantastic way to get a feel for Ubuntu without messing with your main PC or Mac. Everything you do is in its own space, separate from your primary operating system, thanks to the virtual environment. It’s an excellent opportunity to learn the ropes of Ubuntu and Linux and become a pro at the open-source operating system.